|
|
After you have created a basic item edition record using CS080-84, you may need to make some further updates using different screens that can be used with all item edition types. CS086 adds a public code to each new item edition; CS070 lets you update some item edition details for multiple items; and CS073 creates or deletes a new item edition.
Item edition multi-update tool (CS070)
Create or delete new edition (CS073)
Amending or deleting an existing item edition with a schedule
Public code is the general term for the code that is printed on an item. This is normally the only code visible on the item, hence its designation as public. Other codes exist: Planet has its own item id, again, not printed on the item.
For print, public codes are generally ISBNs or supp codes. All other item types have different formats of public codes allocated to them.
Because public codes are allocated to item editions (i.e. each new edition gets a new code), you can see them on the Item edition screen but not on the item record. Public codes are subject to a considerable number of validation checks in Planet because they have to be unique, and different types of items have to be allocated different code formats.
Once a public code has been allocated to an item edition, the origin field on the item edition record cannot be changed without the public code being removed, as choice of public code is related to the choice of origin. Similarly, a public code cannot be allocated until an origin has been chosen on the relevant Item edition screen.

The Public code screen can be viewed by any Planet user but, because it allocates ISBNs, supp codes and other public codes, it can only be used by those who have permission to assign public codes – at present, Production and Presentation Administrators.
Most of the fields on this screen are already familiar and are filled from other screens, mainly the Item edition screen (CS080 – CS084) and Item edition use (CS087).
The International Book Number Agency creates a quantity of ISBN numbers for use by the OU. The ISBNs sold to the OU are distributed by the LTS Portfolio Planning and Control Office to PPAs for use with specific items. They have two formats:
ISBN numbers are used mainly for 'Main text' items, but can sometime also be used for Supps. The CS071 Item search screen is able to convert one version into the other when doing a search, so you can find the correct record where the item has the ISBN-13 but the Planet record still has the ISBN-10.
Changing an ISBN-10 to an ISBN-13
Occasionally it will be necessary to change an item edition's existing 10 digit ISBN to either its converted equivalent 13 digit ISBN public code or a completely new ISBN-13.
Bear in mind that Planet will only allow the ISBN (in either format) to be used once on the system for a single item edition. If a situation arises where an old item edition has an ISBN-10 and a new item edition requires its converted ISBN-13 simultaneously (e.g. for a main text version of a copublished supp), Planet will not allow this as it will pick them out as duplicates. One solution to this is to delete the ISBN-10, put an explanation in the 'Additional public codes used for this item' box and then add the ISBN-13 to the new item edition.
Only two fields are available for data entry. The first is public code. If you are entering a public code, it must conform to the rules for public codes that have been established and agreed. A second field is available should there be one or more codes by which this item is identified that you want to keep a record of.
When you have entered the code, click Save.
OU ISBN |
Either: |
Non-OU ISBN |
characters 1-4 ISBN |
Supp code |
characters 1-3 SUP |
AC(audio cassette) |
characters 1-2 AC |
VC (video cassette) |
characters 1-2 VC |
RC (radio programmes on audio cassette) |
character 1-2 RC |
BC (TV progs on video cassette) |
character 1-2 BC |
CDA (audio CD) |
characters 1-3 CDA |
FT (computer disks) |
Either: or: |
Unit zero |
characters 1-2 UZ |
WEB (online item) |
character 1-3 WEB |
DVD |
character 1-3 DVD |
CDR (CD ROM) |
character 1-3 CDR |
|
|
Multiple update tools allow the user to complete or update a number of fields at the same time for records of the same type. One that you are most likely to want to use is the item edition multi-update tool that allows you to update a number of fields on one or more item editions together.
When you are creating a group of similar items, you can leave the completion of the edition information until you have created all the relevant item records. Then you can complete the specification information for all of them at the same time.
Not all item editions can be updated this way. Some have too few fields that are likely to be common to a large number of items to make such a tool useful. The button bar at the bottom of the screen shows the range of item editions that can be updated using the multiple update. Other item types have to be updated singly.
When you enter the screen, you will be in the Main text screen. If you want to update a different item type, you must click on the button of the item type you want to update.
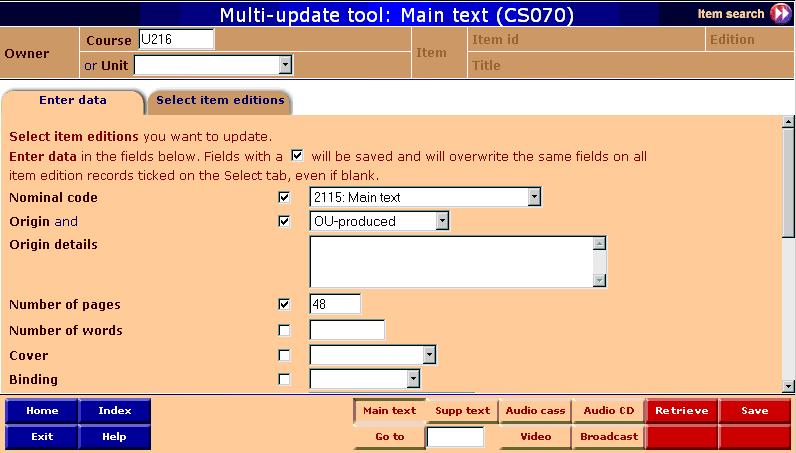
The first tab on the screen shows the fields that are updateable. Not all fields can be updated en masse. For example, title is not likely to be the same for a group of items, so it is not available on the multi-update. But many fields, particularly specification fields, are. A series of module units is likely to have the same specifications. So it is sensible to enter this information in one go.
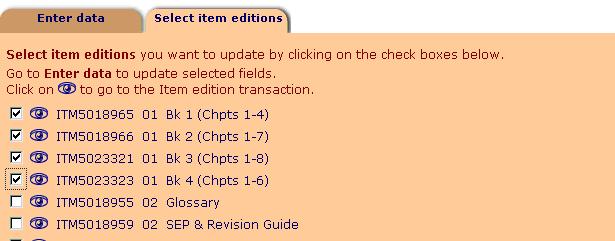
If you have come to this screen by way of the Item edition screen, the module code will have filled for you automatically. However, if you are just entering CS070 from the Main Menu, enter the module code and Retrieve. You can start by selecting the item editions whose records you want to complete or update. Begin by clicking on the Select item editions tab to see a list of records.
Planet will retrieve all the item editions belonging to the selected module or unit and list them for you. You will see all the items of the chosen type displayed. Next to each is a tick box and an ‘eye’ symbol. If you should want to go to the Item edition screen from the multi-update, click on the eye. You will be taken to the item edition record for the item listed next to the eye.
For each item edition that you want to update, tick the box next to its item id and title. You may want to update all module units together because the specifications of all are the same, or you may just want to update one or two fields that are the same for all.
Return to the Enter data tab and decide which fields you want to complete. Fill in the fields.
You will notice that the tick boxes fill automatically when you enter data in the input boxes or make a choice from the drop down list. This is important because any field whose tick box has a tick in it will overwrite the information already on the records you have selected. This means that if you tick a box and don’t enter any data, Planet will save that field as blank on all the items you’ve selected. This may be what you want, but you could also lose data this way.
When you have decided what to update, click Save. You can return to the Item edition screen by way of the eye icon to see what has happened to an individual item edition.
The decision to create a new edition of an existing item is an academic one made by the module team. It may be, for example, that new research or changes in the law make the old edition unsuitable for use.
When a new edition of an item is agreed with the module team and the CAU, there will need to be a new record created on Planet. You do not have to create another item record, but just a new edition record. This will allow the new edition to share the item id with the existing edition and let you see a list of all the different editions at once.
Creating a new edition record is far easier than creating a whole new item record. A new edition shares many basic item details with its preceding editions, which will save you having to manually re-key all the item details.
The new edition normally replaces the old one as part of the module materials. It is not usual for two editions of the same item to be sent to students on the same presentation. Planet does not prevent you from setting up two editions on the same presentation, but it warns you in case you have made an error.
The simplest way to reach the new edition screen is to click on the 'New edition' button at the bottom of the Item edition screen for the edition you want to replace. The new edition screen will show the current edition and any other versions that exist, as well as any modules using this edition.
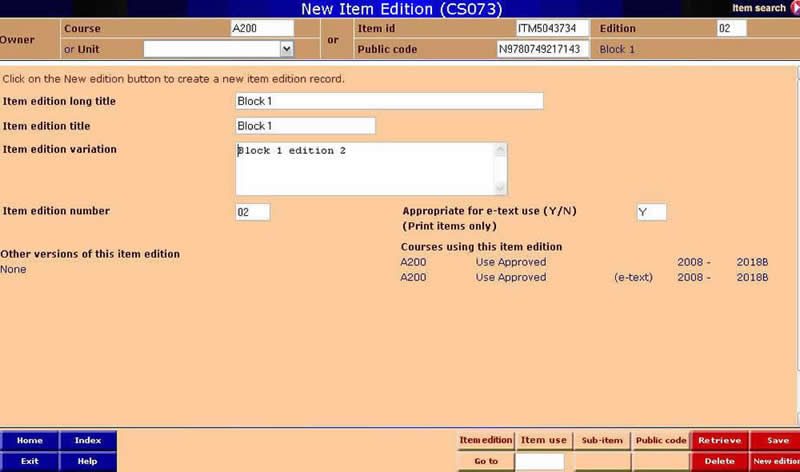
To create a new edition record:
If you have just created an edition in error, and it has not yet got a schedule, you can delete it as follows:
The correct procedure for changing or deleting an Item depends on how far the Item edition in question has been scheduled and whether or not it has been passed downstream to the Tracker or WIMS system. Sometimes the teams in charge of those systems may need to be alerted to the changes so they can bring their systems into line with the Planet changes to the item.
Use the table below to work out which actions need to be taken depending on the state of the Item and what change you want to make to it.
| Item has characteristics | Change required | Necessary actions |
|---|---|---|
| Subtype, no public code, no schedule | Item needs deleting or amending |
|
| Subtype, public code, schedule but no actual | Change to an edition number |
|
| Subtype, public code, schedule but no actual | Deletion |
|
| Subtype, public code, schedule, actual | Deletion |
|
| Subtype, public code, schedule, actual | Change to an edition number |
|
| Subtype, public code, schedule, actual | Amendment to public code |
|
| Subtype, public code, schedule, actual | Amendment to item title |
|