|
|
Module mailings are mainly created and maintained by PPAs, and several Planet screens are used for this. Initially, CS110 is used to create the mailing record or 'container' that has item editions added to it later by using CS111. Eventually, a contents checklist (CCL) is generated and approved by a module contact person using REP14; approval of a mailing inventory in this way locks down CS111 (to ensure that the paper CCL is in synch with the Planet mailing screen contents).
How to get permission to update mailings
Viewing existing mailing records
Important things to consider before creating a mailing
Amending and adding mailing records
First, some terminology. A mailing inventory is the list of item editions available for use on a mailing or mailings for a module presentation or pack mailing period. A mailing is an item or group of item editions that are sent out together, usually to students or tutors. A module presentation or pack mailing period can have one or more mailings. So PPAs create mailings from a stock of items from a module's inventory.
Module mailings are linked to individual module presentations. Before you start creating mailing records, you need to ensure that there is an approved presentation record on Planet for the mailing you want to add. Look at PL019, the module presentation screen, to see which presentations have been set up for your module. If the one you have been asked to provide a mailing for is missing, get in touch with the module contact person whose name appears on PL000. The contact person has update permission to add the necessary data to PL019.
Packs do not have presentations and PL019 is not needed. Information on how to set up pack mailings is given later in this document.
Responsibility for deciding how many mailings there should be, what they contain and when they are sent lies with the module team and the academic unit owning the module or pack. Only those staff with PPA permissions can update mailings. If you require PPA update permission, then one of the Unit Permissions Admininstrators for your Unit can add you to the PPA group by using CS063. You can find out who your UPAs are by retrieving them for your Unit in CS028.
Stock status only may also be updated by members of another staff group (mainly staff in the LTS Project Support Office). Permission for membership of this group is controlled by the Planet System Administrator, requested via the Planet Helpdesk. These permissions should not impinge in any way on any other functions of the mailing screens.
If CS110 is blank when you first go to it, either:
The screen will then display any existing mailing records.
Module |
OU module or pack code of the owning module or pack. |
Presentation |
The module presentation for which you want to create or see mailings. For a pack, enter the date from which the pack-mailing period applies, if known. Otherwise, Planet will list the pack mailing periods available. |
Presentation status |
From PL019, it refers to the stage of CAU approval at which the individual presentation currently stands. |
Presentation start date |
Date on which the presentation officially begins. The corresponding week number is also shown. |
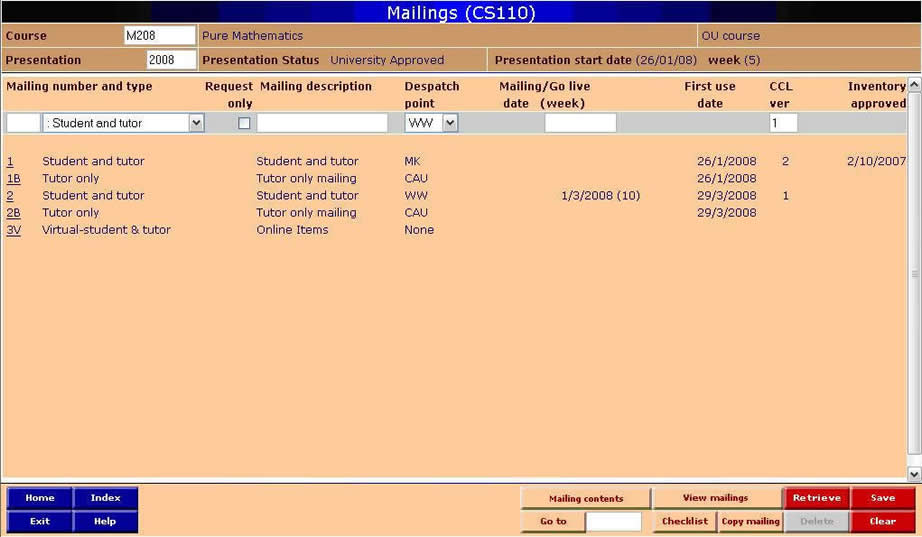
Mailing number and type |
Each mailing is given a number to show its place in the sequence and a letter indicating its type. Mailing types are based on recipients. Each combination of number and type must be unique for any particular module presentation. |
Request only |
Indicates that the distribution of a mailing is to be restricted to those recipients who specifically request it. It has two states - R for Request only, a blank for a standard mailing. |
Mailing description |
The descriptive short title for the mailing. This is optional. |
Despatch point |
Identifies the site from which the mailing will be despatched. |
Mailing date (week) |
The date on which the mailing is to be despatched from the Despatch point. When the date is saved, the week number is shown in brackets as well. |
First use date |
Indicates when an item must be available for use by recipients. The First use date shows the earliest of these dates for the items within a mailing. Because use dates are optional, there may not be any dates from which to derive an 'earliest' (in which case this field will be left blank), or dates may only be provided for some of the items. In the latter case, an earliest will be shown. However, to indicate that it is only the earliest of those dates listed, it will be flagged with an asterisk. |
Checklist version |
The standard CCL format includes a document reference code in the footer. The code will consist of a prefix of CCL, plus a unique numeric code and a number (or letter) indicating the version. The version indicator will normally start at 1, incrementing each time it is changed, up to 9, then from A through to Z. It is maintained manually through CS110. |
The beige navigation buttons at the bottom right of the screen will take you to other useful screens:
It is important to record the despatch point for module mailings, even if this is the academic unit (CAU). This is necessary for recharging purposes, generation of a contents checklist, student queries and management information.
Swap-outs are items that a student can request to replace standard mailed items, for example, floppy disks instead of a CD-ROM. If a swap-out option is available for an item, list the default item to be sent out as in the mailing and enter ‘swap-out available – see mailing 'n’ in the comment field for that item where ‘n’ is the code for the mailing you create to contain the swap-out item. Create a separate mailing for each swap-out item or group of items with the ‘request-only’ marker checked. You cannot duplicate any existing mailing code and type.
Some modules, for example, many OUBS modules, have ‘rolling mailings’. In this case, the mailing is sent to students as they register for a module. For rolling mailings, the mailing date on Planet CS110 should be used to indicate the latest date by which a mailing can be sent.
The OU sometimes undertakes production for external institutions where it does not despatch materials produced by the OU directly to the student, but supplies the materials, either from internal volume production processes or from external printers or other volume producers, in bulk to an external distributor. In this case, a mailing record should be set up with the despatch point set to EXT because the despatch to the student is external to the OU.
In cases where the materials are mailed by Wellingborough to the student, as with UK modules, the despatch point should be set as usual to WW.
Whether or not there are existing mailings, a new one can be created by adding information about the new mailing in the white data entry line as follows:
To change any details for a mailing, click on the Mailing number and this will bring the mailing to the data entry line.
If you want to retain a chronological sequence to your mailing numbers, use CS110 to renumber your existing mailings first, in order to allow the new mailing to have the correct number in the sequence. Renumbering does not affect the items already linked to the mailing.
Because packs can go on without change for many years, the Warehouse can use the same mailing details repeatedly over much of the pack's life, unless a change does occur in the mailing contents. Each period of unchanged mailing contents is called a 'pack mailing period'.
So unlike modules, packs do not need to have individual presentations entered on Planet via PL019, as packs aren't presented as such. Instead, module/pack start and end dates in PL019 (the module/pack life) are used as a basis for the creation of pack mailing periods in CS110.
First, you must enter only the pack code in the CS110 header and Retrieve it in order to find out whether or not a pack mailing period has already been set up.
If no pack periods exist already, you will simply get the same CS110 screen appearing again and must set up a pack mailing period. (Note: if you are not creating the first mailing period, it will be much quicker to use CS113 to roll forward to the new mailing period. You can do this without creating the new mailing period on CS110 beforehand).
You may only delete a mailing with no items in it except the automatically generated contents checklist. If items have been added to a mailing using CS111, go to CS111 and remove the items from the mailing first.